SSH Tunnel
- 3 Minutes to read
- Print
- DarkLight
- PDF
SSH Tunnel
- 3 Minutes to read
- Print
- DarkLight
- PDF
Article Summary
Share feedback
Thanks for sharing your feedback!
This is a step-by-step explanation of how to create and configure an SSH Tunnel.
Introduction
SSH tunneling (also known as port forwarding) is a technique for sending network data across an encrypted connection. It can be used to connect resources from external networks to an internal network without exposing internal resources to the internet. In most Rivery use-cases, the SSH tunnel is used to provide safer and encrypted access from Rivery servers to internal databases in order to retrieve data.
Prerequisites
- A publicly accessible SSH server that is up and running.
- Rivery IPs must be able to access the tunnel server's SSH port.
Note:
This tutorial will show you how to configure the server so that Rivery can access it, but it will not show you how to build the server.
Configuring an SSH Tunnel
Connect to an AWS EC2 Linux instance via SSH, and then use the same connection to connect to the database instance/Redshift/Azure SQL DWH cluster.
Set up an SSH tunnel on AWS EC2 by following these steps:
- Create a small instance in your database. While creating the instance, an internal user (ec2-user in most instances) is created and attached to a KeyPair file (.pem/.pub files). If any additional user for our service in the instance is required, follow the instructions for this procedure and get the KeyPair in order to connect the instance.
- Create a security group for the instance that allows SSH port 22 inbound rules to Rivery IPs.
- Create a security group on your Redshift cluster/database instances that allow inbound rules of ports 5439 from the SSH tunneling instance private IP.
Create SSH Tunnel Using Auto-Generated Public Key
Note:
This part assumes you're using a Linux or Ubuntu SSH server. On Windows, you'll need to install an SSH client like OpenSSH to use SSH.
Run the following commands on your SSH tunnel host:
- Connect to your ssh tunnel server using
ssh(we're using the same example of the aws server created above):
ssh -i /path/to/key_pair.pem ec2-user@<instance-public-ip-or-dns>
- Create a group
rivery:
sudo groupadd rivery
- Create a user
rivery:
sudo useradd -m -g rivery rivery
- Switch control to
riveryuser:
sudo su - rivery
- Create
~/.sshdirecrtory:
mkdir ~/.ssh
- Set permissions to the directory:
chmod 700 ~/.ssh
- Create
authorized_keysfile:
touch ~/.ssh/authorized_keys
- Set permissions to file:
chmod 600 ~/.ssh/authorized_keys
Generate public key in Rivery:
There is a requirement to generate a new public key that will allow Rivery to connect to the server.- In Rivery console, Go to Connections in the main menu and click New Connection.
- Select the correct SSH tunneled source connection (for example, MySQL).
- Select Auto Generated from the SSH Options section.
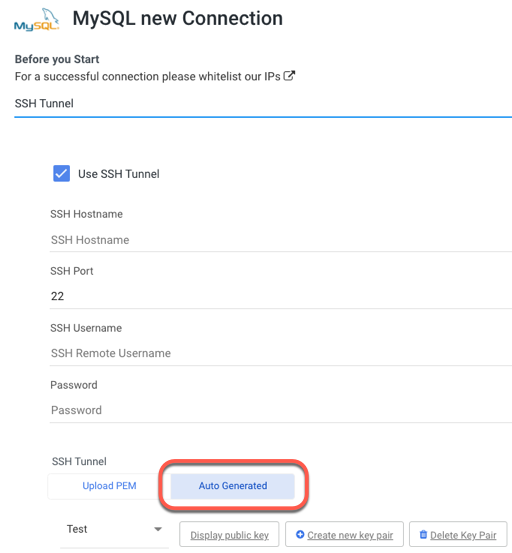
(You can create new key pairs, use existing ones, or delete them).
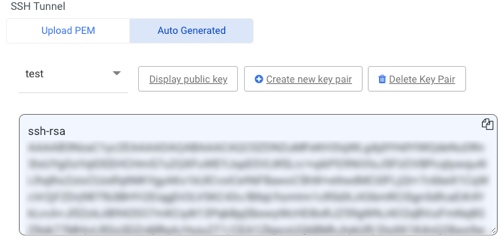
- Click on Create New Key Pair.
Create your Key Pair by giving it a name and clicking the Create Key Pair button. - You can get the public key once the Key-Pair is formed (starts with ssh-rsa). Using the Copy icon, copy it to your clipboard.


- Open the
~/.ssh/authorized_keysfile in your preferred text editor on the bastion server. - Paste the public key (ensure it is pasted on a single line).
- Save and close the file.
Optimizing SSH Tunnel for Security and Performance
There are limits and restrictions on the SSH connections you can have when using a Linux server to configure an SSH tunnel.
For example the 'MaxSessions' parameter in the /etc/ssh/sshd_config config file represents the number of general connections to an SSH server. This is the maximum number of simultaneous SSH connections the server can accept.
Follow these steps to set up multiple SSH sessions in parallel:
- Open the
/etc/ssh/sshd_configfile in your preferred text editor on the bastion server. - Use the following values in your configurations:
ClientAliveInterval 15 # Healthcheck interval
ClientAliveCountMax 4 # Max retries before closing connection 4*15=60 seconds till you close an inactive connection
AllowAgentForwarding yes # Allow ssh forwarding to addional clients if needed
LogLevel VERBOSE # For troubleshooting
MaxSessions 20 # Suggested minimum of 20. Use at least Concurrent Table Runs number.
PasswordAuthentication no # Disables username password connections
PermitTunnel yes  # Enables the ssh daemon to tunnel connection forward
PubkeyAuthentication yes # Enables RSA authentication
StrictModes yes  # Checks permissions of files is limited before approving connection
TCPKeepAlive yes # To avoid hanging session
X11Forwarding no # Rivery does not require X11
- To make the changes take effect, use this command to restart the service:
sudo systemctl restart sshd
Create SSH Tunnel Using an Existing .pem File
Set up an SSH Tunnel Using an Existing.pem File by following these steps:
- Enter the SSH Hostname instance (or IP).
- Input the SSH Port (mostly 22).
- Provide SSH Username and Password.
- Click Choose File and upload the SSH KeyPair file (.pem/.pub) provided when creating the instance in AWS.

Was this article helpful?