Snowflake Upsert-Merge Loading Mode Options
- 6 Minutes to read
- Print
- DarkLight
- PDF
Snowflake Upsert-Merge Loading Mode Options
- 6 Minutes to read
- Print
- DarkLight
- PDF
Article Summary
Share feedback
Thanks for sharing your feedback!
Overview
Rivery allows for 3 distinct options when the Upsert-Merge loading mode option is selected in Snowflake.
The Upsert-Merge option is used to update existing data in a table that may have changed in the source since the last run, as well as insert new records. While all three Upsert-Merge options result in this effect, they differ in the backend process, and have performance implications.

Switch - Merge
The Switch Merge method in Snowflake is a way of merging data from two or more tables or streams into a single table or stream. It works by creating a new table or stream that contains the data from the other tables, and then switching the references to the new table. This can be useful for a number of purposes, such as:
Updating data in a table: By using the switch merge method, you can easily update the data in a table by replacing it with new data from another table.
Consolidating data from multiple tables: If you have data spread across multiple tables, the Switch Merge method can be used to consolidate it into a single table.
Performing "Upsert" operations: The Switch Merge method can be used to perform "upsert" operations, which insert new rows into a table or stream if they don't already exist, or update existing rows if they do.
Switch-Merge Method Flowchart
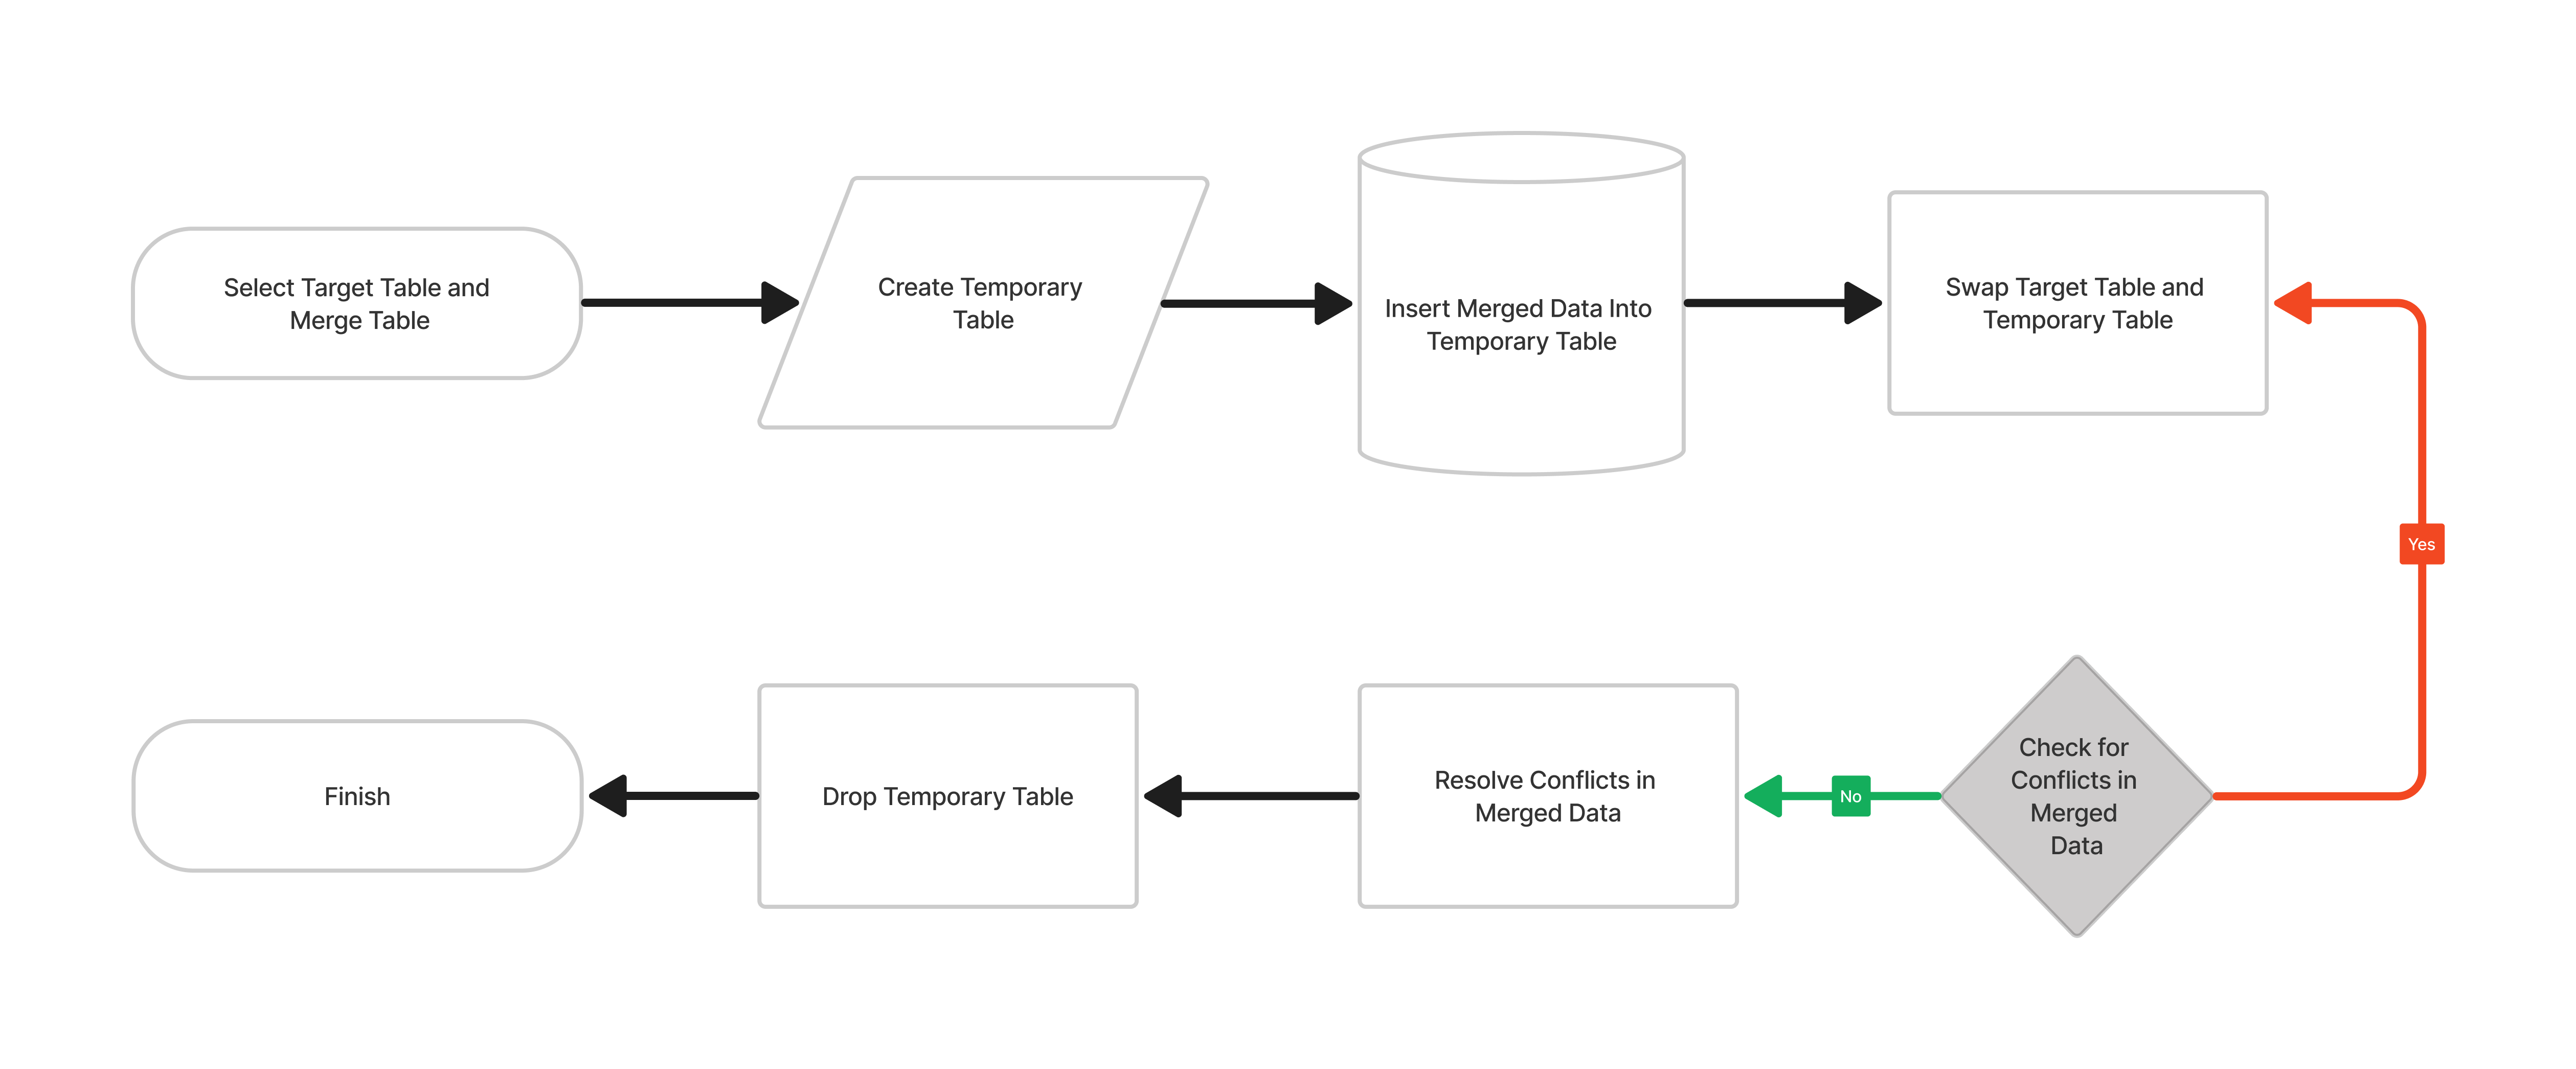
The Steps
- Select target table and merge table: The target table, which will be modified by the merge, and the merge table, which contains the data to be merged, are selected.
- Create temporary table: A temporary table is created to hold the merged data.
- Insert merged data into temporary table: The data from the merge table is inserted into the temporary table.
- Swap target table and temporary table: The original target table is swapped with the temporary table containing the merged data.
- Check for conflicts in merged data: Any conflicts or errors in the merged data are identified.
- Resolve conflicts in merged data: Any conflicts or errors are resolved.
- Drop temporary table: The temporary table is no longer needed, so it is dropped.
- Finish: The process is completed and the merged table is now the current table.
Example
In Snowflake, the MERGE statement allows you to update or insert data into a table, depending on whether the data already exists. The SWITCH statement can be used to control the order in which the WHEN MATCHED and WHEN NOT MATCHED clauses are executed within the MERGE statement.
Here is an example of how you could use the SWITCH and MERGE statements together in Snowflake:
CREATE Table <tmp_target_table>
COPY GRANTS
AS
SELECT col1, col2, col3, col4
FROM (
  SELECT trgt.col1 as col1,
        null as col2 /*In a case the field was dropped from the mapping */,
        trgt.col3 as col3,
        trgt.col4 as col4
  FROM <trgt_table> as trgt
  WHERE NOT EXISTS (
    select 1 from <tmp_src_table> src_ where hash(trgt.key) = src_.gk /* gk created in advanced */
  )
  UNION ALL
  SELECT src.col1 as col1,
        src.col2 as col2,
        null as col3 /*In a case the field doesnt exist in the target */,
        src.col4 as col4
  FROM <tmp_src_table> src
);
In this example, the SWITCH statement is used to select between two blocks of MERGE statements. The first MERGE statement updates rows with even id values, and the second MERGE statement, which is executed when the SWITCH condition is met, updates rows with odd id values.
Please Note:
In cases of Switch-Merge (or other fallbacks to Switch-Merge due to schema changes), we replace the target table. Consequently, when replacing the target table, we must re-grant the original table's permissions.
Delete - Insert
The DELETE-INSERT method in Snowflake allows you to update a table by deleting the outdated rows and then adding new rows containing the updated data. This can be useful when you want to replace all of the data in a table rather than only changing a few rows or columns.
The benefits of using Delete-Insert include the fact that a unique match key is not necessary and that changes to metadata, such as renaming columns or changing the data type, will not cause an error.
Delete-Insert Method Flowchart
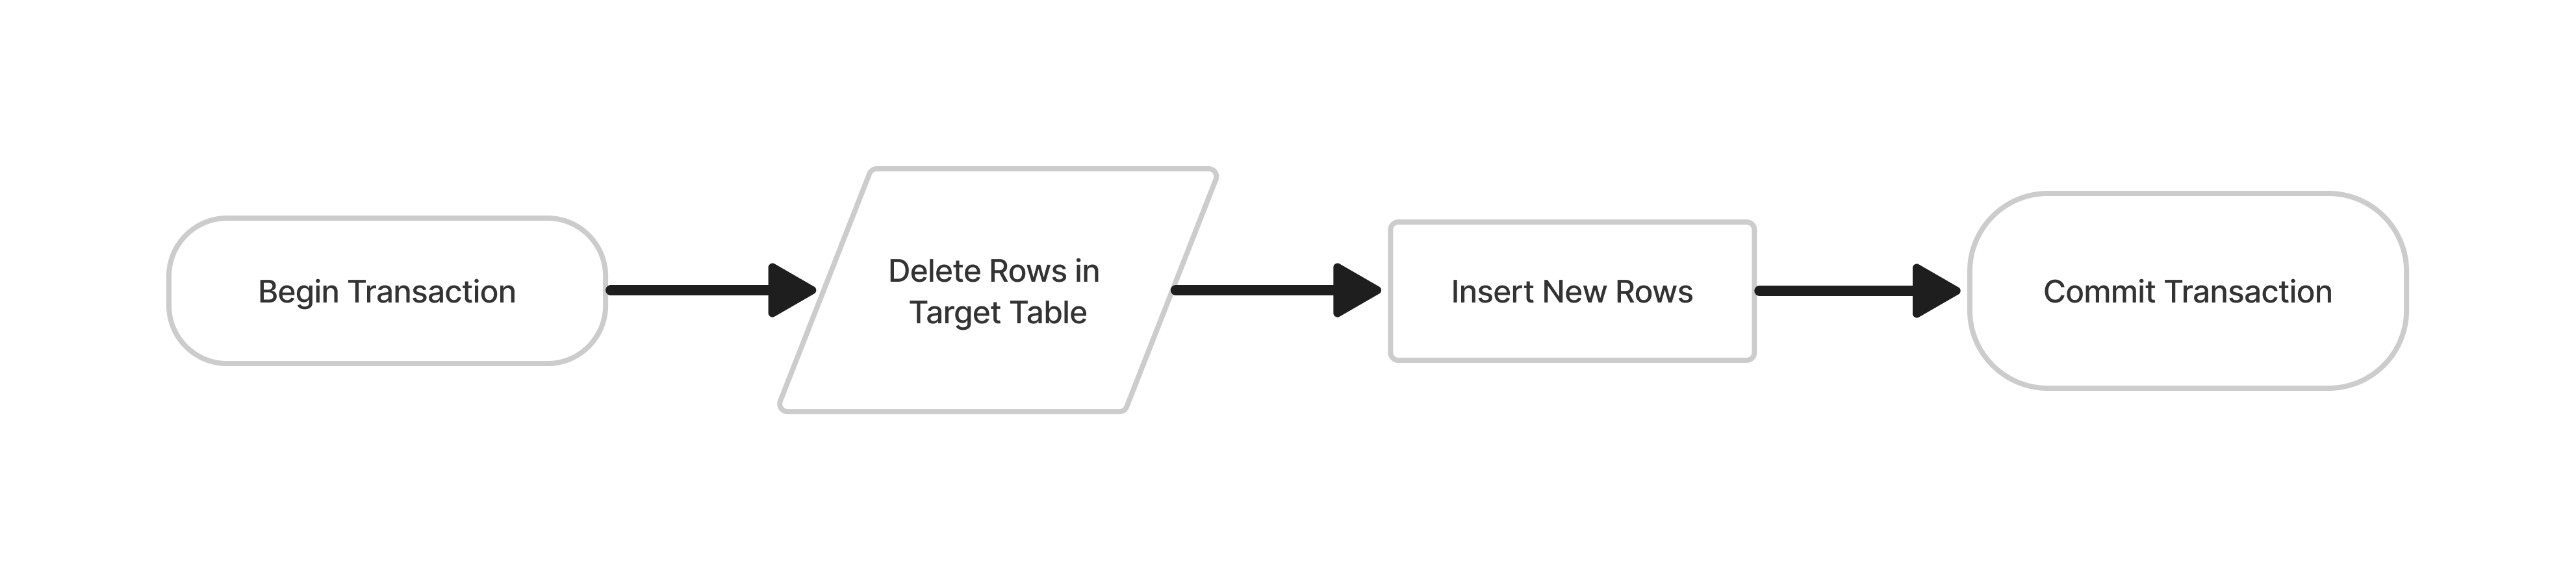
The Steps
- Begin transaction: This step begins a new transaction, which allows you to execute multiple SQL statements as a single unit of work. Transactions are used to ensure data integrity and consistency.
- Delete rows in target table: In this step, all rows in the target table that match the condition specified in the WHERE clause are deleted.
- Insert new rows: In this step, the new rows are inserted into the target table.
- Commit transaction: This step commits the transaction, which makes the changes made during the transaction permanent.
Example
Here is an example of how the DELETE-INSERT method can be used in Snowflake:
DELETE from Database.SCHEMA.metadata trgt_
    USING Database.SCHEMA.tmp_metadata_b8fc00 src_
    where trgt_._adset_id = src_._adset_id

INSERT INTO Database.SCHEMA.metadata(
    _adset_id,_campaign_name,_account_id,_campaign_id,_date_stop,_date_start,_ad_id,_adset_name,_ad_name,_account_name,_reach,_currency,
    _impressions,_actions)
    SELECT _adset_id::STRING as _adset_id,
           _campaign_name::STRING as _campaign_name,
           _account_id::STRING as _account_id,_campaign_id::STRING as _campaign_id,
           _date_stop::STRING as _date_stop,
           _date_start::STRING as _date_start,
           _ad_id::STRING as _ad_id,_adset_name::STRING as _adset_name,
           _ad_name::STRING as _ad_name,_account_name::STRING as _account_name,
           _reach::STRING as _reach,_currency::STRING as _currency,
           _impressions::STRING as _impressions,_actions::STRING as _actions
           from Database.SCHEMA.tmp_metadata_b8fc00
In this example, any rows in the my table table with an id of 123 will be deleted. A new row will then be inserted with the revised values for col1 and col2.
It's vital to keep in mind that altering data in a table using the DELETE-INSERT method may take longer than using the UPDATE statement. This is due to the fact that it requires deleting and re-inserting data, which might eat up more resources than just updating already-existing data. However, there are times when you might wish to fully replace the data in a table, and in those cases, it can be helpful.
Merge
Based on whether the row already exists or not, the MERGE command lets you update or add rows to tables. It can be used to insert data into a table or update an existing one.
Merge Method Flowchart

The Steps
- Identify the Target Table: This is the table that the data from the source table will be merged into.
- Find the source table: This is the table that contains the data that will be merged into the target table.
- Determine the merge condition: This is the condition that specifies which rows from the source table should be merged into the target table.
- Execute the merge: This step performs the actual merge operation, using the target table, source table, and merge condition specified in the previous steps. The merge operation will insert any rows from the source table that do not exist in the target table and update any rows in the target table that match the merge condition with the corresponding rows from the source table.
Example
Here is an example of how to use the Merge method in Snowflake:
MERGE into Database.SCHEMA.RIVER_EXECUTIONS_TM trgt_
    USING Database.SCHEMA.tmp_RIVER_EXECUTIONS_TM_8665e1 src_
    ON trgt_.run_id = src_.run_id
    WHEN MATCHED THEN
        update set trgt_.river_id = src_.river_id,
            trgt_.task_id = src_.task_id,
            trgt_.run_id = src_.run_id,
            trgt_.status = src_.status,
            trgt_.current_files = src_.current_files,
            trgt_.total_size = src_.total_size,
            trgt_.total_files = src_.total_files,
            trgt_.row_update_date = src_.row_update_date,
            trgt_.run_date = src_.run_date,
            trgt_.run_end_date = src_.run_end_date,
            trgt_.account = src_.account,
            trgt_.error_description = src_.error_description,
            trgt_.task_ordinal = src_.task_ordinal,
            trgt_.last_task_activity_id = src_.last_task_activity_id,
            trgt_.datasource_type = src_.datasource_type,
            trgt_.is_hidden = src_.is_hidden,
            trgt_.logic_steps = src_.logic_steps,
            trgt_.units = src_.units,
            trgt_.is_cancel = src_.is_cancel,
            trgt_.target_name = src_.target_name,
            trgt_.source_name = src_.source_name,
            trgt_.scheduler_id = src_.scheduler_id,
            trgt_.is_multi = src_.is_multi,
            trgt_.total_rows = src_.total_rows,
            trgt_.total_tables = src_.total_tables,
            trgt_.env_id = src_.env_id
    WHEN NOT MATCHED THEN
        INSERT (
            river_id,
            task_id,
            run_id,
            status,
            current_files,
            total_size,
            total_files,
            row_update_date,
            run_date,
            run_end_date,
            account,
            error_description,
            task_ordinal,
            last_task_activity_id,
            datasource_type,
            is_hidden,logic_steps,
            units,is_cancel,
            target_name,
            source_name,
            scheduler_id,
            is_multi,
            total_rows,
            total_tables,
            env_id
            )
        values (
            src_.river_id,
            src_.task_id,
            src_.run_id,
            src_.status,
            src_.current_files,
            src_.total_size,
            src_.total_files,
            src_.row_update_date,
            src_.run_date,
            src_.run_end_date,
            src_.account,
            src_.error_description,
            src_.task_ordinal,
            src_.last_task_activity_id,
            src_.datasource_type,
            src_.is_hidden,
            src_.logic_steps,
            src_.units,
            src_.is_cancel,
            src_.target_name,
            src_.source_name,
            src_.scheduler_id,
            src_.is_multi,
            src_.total_rows,
            src_.total_tables,
            src_.env_id
            )
In this example, the MERGE statement updates the column2 value in the target_table for rows that have a matching primary_key value in the source_table. For rows in the source_table that do not have a matching primary_key value in the target_table, the MERGE statement inserts these rows into the target_table.
Was this article helpful?