


Adding a New Data Source to your Database in 3 Simple Steps

Adding a new data source to your Rivery account is as simple as it gets.
Here’s a quick guide to map a new source and add it to your analytic database. This is what we call “creating a river”!
The process of adding a new data source has 3 steps:
Choose Your Data Source
Rivery allows you to pull data from various data sources. A dedicated screen will guide you through the options supported by your chosen data source.
Each source has its own options for how to pull their data. In cloud services such as Google Adwords (example below) or Bing it can be about selecting reports or fields, while in other databases it could be about selecting and pulling fields from a table.
Each source that you add will save your connection details so you can use it across multiple rivers.
For example, once you’ve connected your Zendesk account, Rivery will remember your details to use multiple Zendesk end points across different rivers that pull data from the same account.

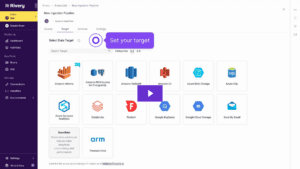
Choose Your Target
Rivery supports all major cloud platforms. Just select your target connection from the drop-down menu, insert your Dataset ID, and set your target table name – if it does not exist, Rivery will automatically create it for you.
After this, you have to set your loading mode. Select either ‘append only’ or ‘overwrite’, the standard loading modes in any cloud analytic databases.
You can create a single table, or split it to multiple tables, according to the timestamp or other expression – so your queries will run only on the relevant data, and not across all my data.

Map your data to fit your analytic database
For this final step, simply run Rivery’s auto-mapping to map your data to the target table structure.
You will be able to remove fields, rename fields or add other fields based on SQL expressions to the target table (this will add the expressions as columns in the target table).
Click on the Save & Run button to test the river you created and you will get a confirmation showing “River done Successfully”. Congratulations!

Once a river is set, all you have to do is click the “Scheduling” tab to select how often you would like your source to run.
You can also add a list of emails to be notified if a river fails.

That is it. Repeat this process for each data source you use and you’ll be set up in no time.


Minimize the firefighting. Maximize ROI on pipelines.