


How to Integrate SFTP with AWS S3 Fast

If you want to share your files online, you need a fast, safe, and easy way to do it. That’s why many people are using SFTP over the old FTP method. With that in mind, the integration of SFTP with AWS S3 (also known as Amazon S3 or S3 for short) is a common requirement as S3 is often where you end up storing files for different purposes, essentially forming a data lake. This integration lets you store and transfer any amount of data, from anywhere, and at any time you want.
Just like the transition to Google Analytics 4 has changed how we measure web traffic, SFTP, and S3 are now common ways to manage and secure our file data. With the right preparation, tools like AWS Transfer Family for creating SFTP servers, and platforms like Rivery for codeless data integration, the transition can be smooth and straightforward.
In this article, we will provide a step-by-step guide on how to set up SFTP and S3 integration fast. You will learn how to transfer your data to S3 for better analysis. Whether you’re looking to safeguard sensitive information during transfers, leverage the cloud for its scalability, or simplify your data pipelines, this guide will teach you the tools and techniques you need.
What is SFTP (SSH File Transfer Protocol)
SFTP is a secure file transfer protocol used securely between a client and a server over the Internet. It is an extension of Secure Shell (SSH).
Think of SFTP as a secure version of FTP (File Transfer Protocol), which has been used widely for many years to transfer files. However, unlike FTP, SFTP encrypts both commands and data. This is why SFTP is replacing the usage of FTP.
It provides an added layer of security to prevent sensitive information from being intercepted or exposed during the transfer process. This encryption ensures that data is safely transmitted, making SFTP a preferred choice for transmitting files containing confidential or critical information.
SFTP is not just about encrypting the data. With SSH 2.0 in place, it also authenticates both the client and the server, ensuring that both parties are who they claim to be. This is usually done through digital certificates or key pairs, adding another layer of security to the process.
To know more about SFTP, you can check the official website here.
What is Amazon S3
Amazon Simple Storage Service (S3) is a scalable cloud-based object storage service that offers unparalleled scalability, data availability, security, and performance. It allows you to store and retrieve any amount of data from anywhere on the web.
With cost-effective storage classes and easy-to-use management tools, you can store data across different tiers based on your access patterns and save costs without compromising durability or availability.
A notable aspect of S3 is its capacity to handle vast amounts of data. It offers the convenience of storing, uploading, or downloading files as large as 5TB. It also allows users for a single upload size of up to 5GB for handling extensive data requirements.
Prerequisites for this integration
Before starting your S3 SFTP integration, you should maintain the following prerequisites:
- Create an S3 bucket to store your files
- Create an IAM role to give access to your bucket
- Edit the IAM role to trust the AWS Transfer Family
This lets Transfer Family use your role to access your bucket and transfer files for your users.
Creating an SFTP Server
SFTP to S3 integration is not as hard as you’re probably thinking. You only need to set up an SFTP server before the integration process starts. Here’s a step-by-step guideline to create an SFTP server in AWS:
Step 1: Create a new server
Step 2: Configure a user
Step 3: Execute SFTP commands
Step 1: Create a new server
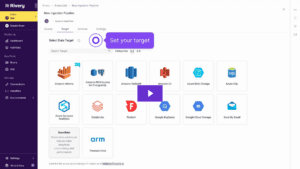
Open the AWS Transfer console and select Servers from the navigation pane, then select “Create Server”. To create an SFTP server, choose SFTP just like the image below, and select Next.
To learn more on how to create a new server, you can visit the official documentation of Amazon AWS here.
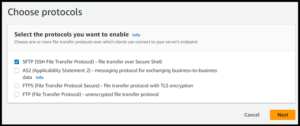
Image credit: AWS DOCS
Step 2: Configure a user
When you successfully create the SFTP server, you can now add a new user. You can use either a service-managed identity provider or a custom identity provider to store and authenticate your users.
After selecting your server, click “Add user.” Enter the username and choose the IAM role to access an Amazon S3 bucket. Specify the home directory within the S3 bucket and enter the SSH public key using ssh-keygen for secure access.

Image credit: AWS DOCS
Step 3: Execute SFTP commands
You have successfully created your SFTP server and configured it according to your needs. You can now access it by using the server endpoint that you obtained from the console. You can use an SFTP command from your terminal to test the connection.

Image credit: AWS DOCS
Creating a Managed SFTP Service
SFTP to AWS S3 integration also requires you to create a managed SFTP service. You can use a managed SFTP service to connect your storage and create SFTP users for your external parties, without having to install or maintain any software or hardware.
To create a managed SFTP service using AWS Transfer Family, you need to follow these steps:
- Step 1: Use the AWS Transfer Family console to create an SFTP server mentioned in the previous section.
- Step 2: Modify the trust relationships of the IAM policy and provide permissions to the new user (follow the steps in the previous section).
- Step 3: Go to the role page and click on Trust relationships. This shows that the role can work with transfer.amazonaws.com.
- Step 4: Click on Edit trust relationship and open the JSON document. Change Statement[].Principal.Service to transfer.amazonaws.com:1.
 {
 "Version": "2012-10-17",
 "Statement": [
 {
 "Effect": "Allow",
 "Principal": {
 "Service": "transfer.amazonaws.com"
 },
 "Action": "sts:AssumeRole"
 }
 ]
 }
Code Source: Aws.Amazon
The S3 SFTP combination perfectly works if and only if you choose the right settings. You need to connect to the previously created SFTP server to transfer files. You can connect to the SFTP server that you made before like any other SFTP server. You can find the server name on the server page as an Endpoint.
Overall, you can follow the official documentation to integrate S3 and SFTP.
![]()
![]()
Image credit: AWS DOCS
How Does Amazon S3 Transfers Files?
When you transfer files to Amazon S3, you need to specify a bucket and a key for each file. Amazon S3 transfers files using the HTTPS protocol to ensure secure and reliable data transmission. It uses a web service interface and an HTTP REST API to transfer files over HTTPS protocol.
The REST API does not keep any information about the client sessions on the server. It is a “stateless” protocol. It is a protocol that uses HTTP requests to GET, PUT, POST, and DELETE data. Finally, you need to use the built-in Amazon file transfer interface.
However, if you don’t know coding, it will be difficult for you to initiate an S3 SFTP transfer. This is where Rivery comes into the scenario. Rivery helps customers extract data from SFTP to S3 without code.
So, how can you integrate SFTP with AWS S3 faster with Rivery?
Steps to move SFTP files to S3 in minutes using Rivery
Rivery is a cloud-based data integration platform that simplifies the process of building scalable, production-ready data pipelines. With Rivery, you can easily extract data from SFTP and load it into Amazon S3 without writing any code or setting up a SFTP server.
You can also complete your entire ELT pipeline with SQL or Python transformations, giving you full control and flexibility over your data. Whether you need to migrate, consolidate, or analyze your data, Rivery can help you do it faster and easier.
You can set up the SFTP S3 Integration, using the following steps:
Step 1: Create a source to target River: Begin by creating a new data pipeline in Rivery.
Step 2: Source Connection Setup: Establish a connection to your SFTP server as the source.
Step 3: File Selection and Extraction: Specify the folders to pull data from and select the extraction method.
Step 4: Define File Paths: Set up the file paths and patterns to identify the specific files to transfer.
Step 5: After-Pull Actions: Decide what happens to the files after they are pulled from the source. Retain the original location and transfer them to an archive by specifying a container name and an optional folder path for archiving. Finally, opt for deletion to remove the files completely after the transfer.
Step 6: Specify File Types and Target: Select Amazon S3 as the target data lake. Choose the file type to store in S3. You can choose CSV, JSON, Excel, or other file type. However, if you want a compressed file, make sure to mark the “Is Compressed” checkbox.
Step 7: Run and schedule your pipeline: Define the frequency at which the pipeline will run so your SFTP files automatically move to S3 on schedule.
If you want to know more about how the integration of S3 SFTP works with Rivery, you can read the docs here or simply follow this product tour:
Once your data is in S3, serving as your data lake, you can start using your data for different purposes including analytics, machine learning workloads, and capturing historical snapshots for regulation purposes. With Rivery, you can move your S3 data further to a data warehouse or keep it in S3 but make it analytics-ready via Amazon Athena.
Conclusion
SFTP to S3 integration is a common use case for many businesses that need to transfer data files securely and reliably from one location to another. However, setting up and maintaining an SFTP server and a managed SFTP service can be challenging and time-consuming, especially if you lack the technical skills or resources.
Your feedback on the integration of SFTP with AWS S3 using Rivery, or any other use cases you’re exploring, is invaluable to us. Our goal is to simplify your data management tasks, making the creation of data pipelines not only possible but effortless. We look forward to hearing about your experiences and any additional needs you might have. Together, let’s make managing data in the cloud a seamless part of your business operations.


Minimize the firefighting. Maximize ROI on pipelines.